
1. Introduction
Every article about Network Attached Storage (NAS) reminds readers that a NAS is not a backup system, even if it runs multiple drives in a mirrored RAID configuration. When I bought my QNAP NAS four years ago, I was well aware of this advice, but I chose to ignore it. I primarily used my NAS as a backup device, and occasionally to serve files. However, recent SMART scans on one of my hard drives started throwing health warnings. While this doesn’t mean immediate disk failure, it was a sharp wake-up call. It was finally time to back up my NAS to an external hard drive.
The solution recommended by QNAP and discussed in many places is Hybrid Backup Sync (HBS 3). I gave it a try, but I didn’t like it. I am not going to write a proper review of the software now, but I am don’t think I would give it more than 2 stars. After a few failures with a cryptic error codes (I think it was Error: 21, which was not explained in any list), I finally got a full backup to complete. Shortly after, HBS 3 started reporting that “files were damaged at destination” during checks. It turned out these “damaged” files were simply items I had deleted from the source drive. Even after subsequent backup runs, HBS3 kept throwing the same error. Between these false alarms and the fact that HBS 3 relies on proprietary formats, I completely lost trust in it.
About one year ago, I started using restic on my Linux desktop. Despite the various GUI available, I quite like using it in command line. In this guide, I will describe how to install restic on a QNAP NAS and use it to backup your data to an external drive. This guide assumes you are comfortable using the command line and already have SSH access enabled on your NAS.
2. Installing restic on your NAS
There are three methods to install restic on your NAS:
- Create a container which contains restic - recommended as the installation will be isolated from the rest, but it comes with some challenges
- Download the binary - but you need to be careful where you install it as it may get deleted during upgrades
- Download the
.qpkgfile from MyQNAP.org
I decided to go for the first option, because it also gave me the opportunity to try containers on my NAS. The installation was quite straightforward using “Container Station”.
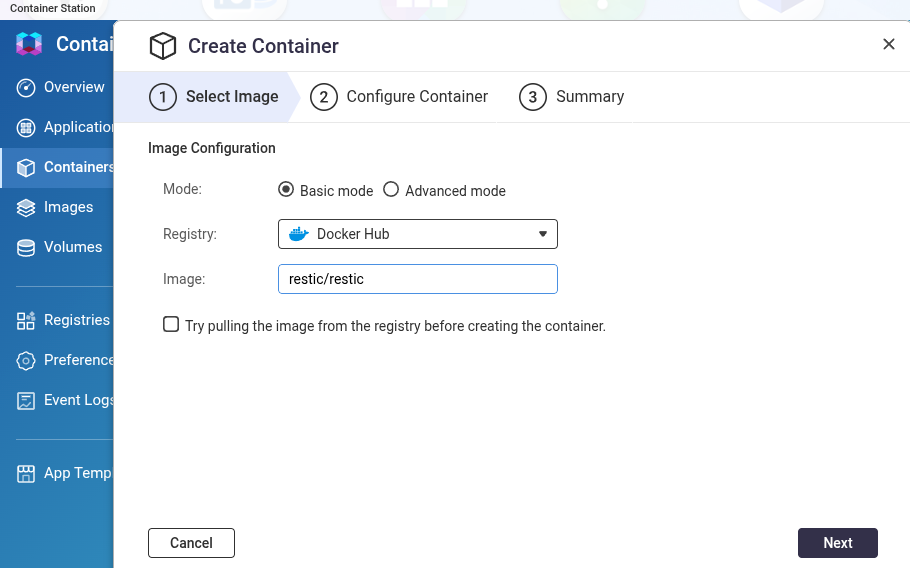
Create a new container using the restic/restic image
An important option that you need to specify when you create the container is related to the restart policy. Make sure that you select the value None for the Restart policy as shown in the screenshot below. This will prevent docker from trying to restart the container continuously.
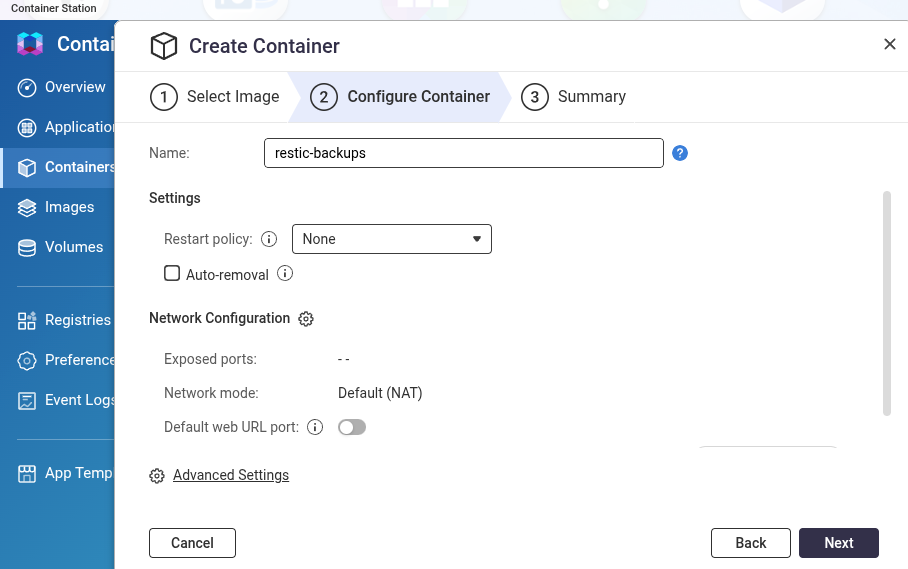
Give the container a name and set the Restart policy to None
The “restic/restic” container is a one-shot container. Unlike standard services, it doesn’t run continuously in the background; instead, it executes a specific command, completes its task, and immediately exits. To keep your system clean, you should run it with the --rm (auto-remove) flag so Docker automatically deletes the stopped container. For example, after you have installed the container, you can test whether it works by trying to get the restic version. Run the following command on your NAS.
docker run --rm restic/restic version
In order to run a restic command in the container, you will need to use the following command:
docker run --rm -it \
  -v <paths from the NAS available in the container> \
  -e RESTIC_REPOSITORY=<path to repository> \
  restic/restic <restic command and parameters>
The -v parameter mounts directories from the NAS into the container. These will be the directories that you want to backup and the path where you backup repository lives. For example, my setup includes
-v /share/Backup:/Backup:rwto mount the/share/Backup(the directory on my external drive where the backup repository is stored), to the/Backuppath in the container. The directory is mounted in read-write (rw) mode.- Since I want to backup the
/share/Multimediadirectory, I also have-v /share/Multimedia:/multimedia:ro, but this time I mount the directory read-only (ro).
These paths can be passed via the Docker CLI (in my case) or configured directly in QNAP Container Station’s setup menu before creating the container.
3. Initialising the repository
As with any Restic setup, the first step is to initialize the repository using the init command.
docker run --rm -it \
  -v /share/Backup:/Backup:rw \
  -e RESTIC_REPOSITORY=/Backup/restic-repo \
  restic/restic init
The repository will be created in the restic-repo directory inside the /share/Backup. The -it flags make docker run the container interactively and prompt you to provide the password from the keyboard.
To avoid entering a password manually, you have two main options:
- Password File: Pass
-e RESTIC_PASSWORD_FILE=/Backup/restic-pw.txt(or--password-file), making sure the file exists within a mounted container path. - Environment Variable: Pass
-e RESTIC_PASSWORD="YourPasswordHere"directly to the container.
Note: While convenient for testing, hardcoding passwords in environment variables can leave them visible in your shell history or process list, so a password file is generally preferred for production.
4. Running the actual backup
Running the actual backup is straightforward and closely mirrors running Restic natively from a command line. The main requirement is ensuring every directory you want to back up, as well as your repository target, is correctly mounted inside the container. In my case, I use the following command.
 docker run --rm -it \
  -v /share/NAS-SHARE/:/data:ro \
  -v /share/Multimedia:/multimedia:ro \
  -v /share/homes:/homes:ro \
  -v /share/Backup:/Backup:rw \
  -e RESTIC_REPOSITORY=/Backup/restic-repo \
  restic/restic backup /data/Backups /multimedia /homes --exclude="**/.*__thum*"
You can exclude certain files or patters from backup using the --exclude option. Before running a full backup for the first time, it’s always a good practice to append --dry-run to test your configuration and make sure your paths resolve correctly without writing any data.
When the backup has completed, I was “rewarded” with the following message:
repository 4e569d5f opened (version 2, compression level auto)
created new cache in /root/.cache/restic
no parent snapshot found, will read all files
[0:00]          0 index files loaded

Files:       225697 new,     0 changed,     0 unmodified
Dirs:        36852 new,     0 changed,     0 unmodified
Added to the repository: 1.475 TiB (1.464 TiB stored)
Backup-ing the 1.475T of data took a while.
5. Checking the backup
Once the backup has completed, you can do the usual checks of the backup. For example, you can display the snapshots.
docker run --rm -it \
  -v /share/Backup:/Backup:rw \
  -e RESTIC_REPOSITORY=/Backup/restic-repo \
  restic/restic snapshots
Because this was my initial backup, there is only one snapshot.
repository 4e569d5f opened (version 2, compression level auto)
created new cache in /root/.cache/restic
ID        Time                 Host          Tags        Paths          Size
---------------------------------------------------------------------------------
6451e52c  2026-07-20 22:08:24  8b8d5b71100b              /data/Backups  1.495 TiB
                                                         /homes
                                                         /multimedia
---------------------------------------------------------------------------------
You can also verify the health and integrity of your repository using the check command. This scans the structural data inside the repository to ensure there are no corrupted indexes or missing snapshots. It is a good idea to run this command periodically.
docker run --rm -it \
  -v /share/Backup:/Backup:rw \
  -e RESTIC_REPOSITORY=/Backup/restic-repo \
  restic/restic check
In my case, everything seems to be fine.
using temporary cache in /tmp/restic-check-cache-2900005264
create exclusive lock for repository
enter password for repository:
repository 4e569d5f opened (version 2, compression level auto)
created new cache in /tmp/restic-check-cache-2900005264
load indexes
[0:16] 100.00%  159 / 159 index files loaded
check all packs
check snapshots, trees and blobs
[0:18] 100.00%  1 / 1 snapshots
no errors were found
For a more thorough verification that reads and validates the actual file contents (not just the structural metadata), you can append --read-data to the command. Running this check takes much longer.
Now that you have restic running in a container, you can run any of the commands restic provides.